Showing posts with label Tutorial Virtualmin. Show all posts

Friday, June 12, 2015

How To Create Sub-Domain in Virtualmin

Hello again, now i'm gonna show you how to "Create Sub-Domain in Virtualmin" in this tutorial i will install roundcube and add sub-domain pointing to roundcube. Roundcube is a web-based email client. In previous post, i have explain how to create sub-server in Virtualmin (How To Create Sub-Server Virtualmin), Sub-Domain and Sub-Server are diffrent, and the way to create it is diffrent.


Before we want to create Sub-Domain or Sub-Server, we must know what is the diffrent, how do they act, and the structure in directory.
Let's take an example : forum.angelimusvps.tk, let see the structure both Sub-Domain and Sub-Server, see below.

Sub-Server directory of forum.angelimusvps.tk
/root/home/angelimusvps.tk/domains/forum.angelimusvps.tk/public_html/<website files>

Sub-Domain directory of forum.angelimusvps.tk
/root/home/angelimusvps.tk/public_html/forum/<website files>

Okay, lets start create Sub-Domain.

Step 1 - Install Roundcube 
(you can skip this step if you already have directory for sub-domain destination directory)
1. Open your browser, and login to your terminal.
2. Choose your domain that you want to install roundcube on left panel, by click the drop down menu.
3. Click Install Script on left panel, and see on the right panel, in email section, click on roundcube
4. Click on Play Button on the Right or Simple Just Click "Show Install Options"
5. I'm gonna use my domain in this case angelimusvps.com, so my "Database for RoundCube preferences" = angelimusvps_tk_roundcube (MySQL, new database)
6. Install sub-directory under public_html = DO NOT CHOOSE at top level, and type roundcube, by default its checked beside that.
7. Click "Install Now"

Note :
(1)For someone of you that running Centos 6, maybe have a little problem in PHP Version, in my case, i can't install roundcube, because my PHP Version is 5.3.3 so i must upgrade into PHP 5.4.x, see this tutorial to upgrade your php How To Upgrade PHP 5.3 to 5.4 in Centos 6

(2)After installing roundcube, now try open your browser and type http://<yourdomain>/roundcube if nothing  happened, or it's like downloading or saving something else, maybe thats normal, because i have same problem like that before, now go to virtualmin again, on left panel > angelimusvps.tk (as domain) > Server Configuration > Website Option > PHP script execution mode = Apache mod_php (run as Apache's user) 

Click save, now try again open your roundcube http://<yourdomain>/roundcube

Step 2 - Create Sub-Domain 
Now i'm gonna make subdomain inbox.angelimusvps.tk that point to /home/angelimusvps.tk/public_html/roundcube

1. Manage your domain in your domain provider.
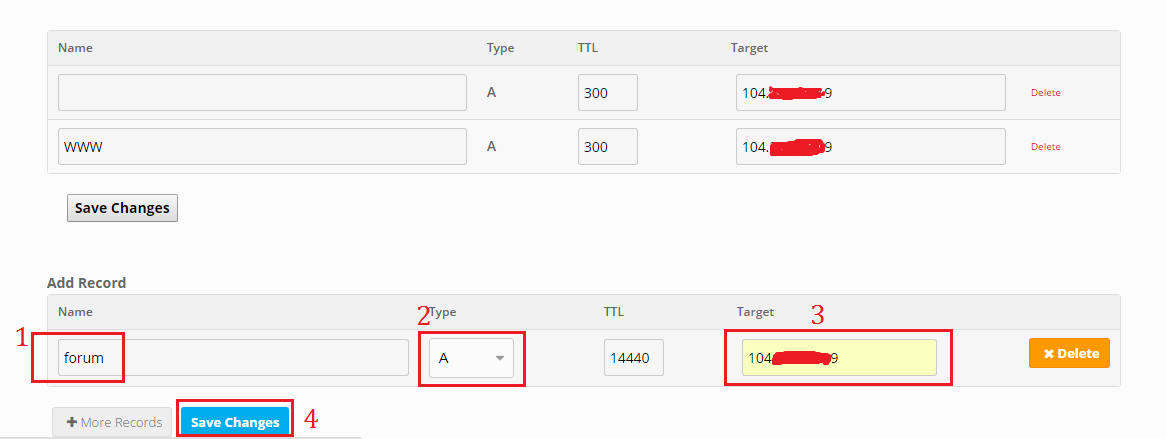
My domain is free domain from freenom.com, so i login to freenom.com and manage  freenom domain, add new record inbox A (your ip) see image below
after that click on save changes, wait about 10-30 minutes, i usually only wait about 10 minutes.
to check if it already registered, try ping inbox.<yourdomain>.tk if no reply or time out, wait again a few minutes and ping again. If you still confuse about this manage dns, see my previous tutorial in ()

2. Go to Virtualmin, on left panel, on top section, click on Webmin
3. Click Servers > Apache Webserver, now see on right panel, click on "Create Virtual Host

1. Choose "Spesific address" = your vps ip address
2. "Document Root" = find your directory that you want to redirect to subdomain.
3. "Server Name" = just type your subdomain, i type inbox.angelimusvps.tk
Click "Create Now"

Note : after you click create now, see on top right section, Click "Apply Changes", then "Stop Apache", then "Start Apache"

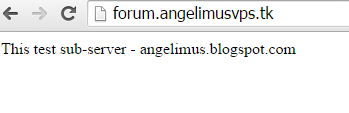
Open your browser, and type your subdomain, ex : http://inbox.angelimusvps.tk you will see your sub directory redirected to sub-domain.

I think that's it for now, if your have a better and simple and more secure, feel free to share on comment section, and see you in next tutorial.

Thursday, June 11, 2015

How To Create an Email Account for Virtualmin

Email is the most important things in your personal or bussiness website, email is one of the media to communicate between admin and user of website, beside social media. Its nice if you have email with your own name and your own domain, it can boost your popularity of your website too, for me i prefer emailing rather than calling or pm in social media, because i have high intense in checking my email, but remember, emailing can consume more resource to your VPS, in some VPS Host, there are some restriction about mass mailing, it is a feature to mailing all your costumer or all your friend or all people that you dont know for reason is promoting your website or something that you thinks it is necessary, 

Now we will begin to create email user in Virtualmin, i assume you already create website in virtualmin, if not, see previous tutorial ( >> How to Create website in Virtualmin)

Step 1. Accessing Virtualmin
Open your browser and login to your virtualmin by entering
Https://<your domain or VPS IP Address>:10000


I using domain from freenom.com as i mention in previous tutorial (How To Create Sub-Server in Virtualmin) which is angelimusvps.tk

Step 2. Creating and Cofiguring User in Virtualmin
1. Click on edit user on the left panel (see pic below)


2. Click on Add a user to this server (see pic below)

see in the list, there are already angelimusvps.tk,
that user is by default create when we create virtual server in earlier tutorial about 

3. See picture below
1. Email Address : this is email address username (ex: admin, or support, or yourname, etc)
2. Real Name : Type your Real Name or anything you like.

3. Password : create the password for your username (password will be used in here >> (


Mail Forwarding Setting
4. Tick "Yes, forward to address" and type the destination email, if you want to forward automatically your email from this account to another email account.
5. Tick "Yes, repond with message", if you this, when your user or friend sending you an email, there will be an automatically reply email to sender.
ex: "A" sending an email from angel@yahoo.com to your email admin@angelimusvps.tk, after "A" sending an email, he/she will automatically get a reply from admin@angelimusvps.tk.
This feature usually contain a greetings or welcome message, etc. Just type a good sentence here if you want to enable this feature.
6. Minimum time between autoreplies, for security reason i recomend you to DO NOT Choose "No Minimum", because if someone do an email bomber to your email account, it cause a heavy duty to your VPS it will result you get banned by your host. Just select about 5 or 7 minute for safety.

7. Click Create, to create your email user.

It's done, see you in next tutorial about virtualmin.

Wednesday, June 10, 2015

How To Create Sub-Server Virtualmin

Hello again, in previous Tutorial Topic about How To Create Multiple Website on Virtualmin, now i want to share How To Create Sub-Server on Virtualmin using Centos 6 64Bit.
In this tutorial i still use VPS from Evoburst.com, the reason is, Evoburst.com provide high resource with low end price.


Step 1 - Manage Domain and Add Sub-Domain in DNS Management
- Login to freenom.com
- Click on Domains > My Domains      (see pic below)


- Click on Manage on Domain you create in previous tutorial before (Tutorial host multiple website using Virtualmin)  (see pic below)


- Click on Manage Freenom DNS
-

- Add your subdomain name (in this tutorial i using forum as subdomain), Type = A, Target = <vps ip address> (see pic below)
- Click on Save Changes


- Now wait about 5-10 minutes, while trying this
- Open terminal and type this code
host forum.angelimusvps.tk ns01.freenom.com

Note change forum.angelimusvps.tk to <your-sub-domain>.<domain>.tk.co
- if the result is forum.angelimus.tk has address 104.xxx.xxx.x9
- it means your subdomain is registered.


Step 2 - Creating Sub-Server on Virtualmin
- Now go To Virtualmin (see pic below)

- Then Click on Sub-Server
- Domain Name = <your-sub-domain>.<domain>.tk.co      ex: forum.angelimusvps.tk

- Click on create server, now open the browser, and type <your-sub-domain>.<domain>.tk.co      ex: forum.angelimusvps.tk

- If you got error like this
- It means your subdomain is ready to use.
- Open terminal, and type
cd /home/angelimusvps.tk/domains/forum.angelimusvps.tk/public_html
echo "This test sub-server - angelimus.blogspot.com" >> index.html

- Now your browser again and refrsh, like picture above. (see pic above)
Thanks for reading my tutorial, supported by freenom.com and evoburst.com

Tuesday, June 9, 2015

Tutorial host multiple website using Virtualmin

Now, i want to share my experienced in hosting multiple websites on your VPS that running Centos 6 64 Bit, using Virtualmin as web management. In previous tutorial, i have share how to install wordpress in VPS, and if you follow my tutorial from beginning (all tutorial are in this blog, just visit angelimus.blogspot.com) i have install many packages to my VPS and NOT Using Fresh Install to Install Virtualmin, so there are a few thing can cause trouble in future, but it's not a big deal, i believe that every problem has a way out.
Since installing Virtualmin, i use VPS from Evoburst.com, cause it have more than enough RAM and CPU Resource.


Now, after through the "boring part" (Tutorial Post-Installation Wizard Virtualmin) but maybe the important ones.

If in your VPS you install SSH Dropbear (Part 5 - Installing SSH Dropbear on Centos 6 64Bit), then you must follow this tutorial from Step 1, if you not installing SSH Dropbear, just skip this step, and go to Step 2

Step 1 : Solving conflict on Port 443 between SSH and SSL
Open your terminal
sed -i 's/OPTIONS="-p 443"/OPTIONS="-p 444"/g' /etc/init.d/dropbear
Now your port for SSH Dropbear is "444", conflict solved.

Step 2 : Register free domain at freenom.com
(If you already have registed domain you want to use, like mynewvps.com or mywebhost.com, etc, the point is it registered and still active, then you can skip this Step, go to Step 3)

  1. Open your browser, and go to http://www.frenom.com (why freenom? because it free, no cost at all, and this is for testing purpose).
  2. Find domain you like, then click check availability, choose from the list thats free, (see pic below)
  3. Click Checkout
  4. Click USE DNS, in type your VPS ip address there, type the same ip addpress on both. (see picture below)
  5. Click continue, and follow the instruction until finish.

Step 3 : Host Multiple Website
Open your browser, and go to Virtualmin by type
https://<vps ip address>:10000/
1. Login with username = root and password = (your root password)
2. i assume you already done step (Tutorial Post-Installation Wizard Virtualmin)
3. See on left panel, Click on Create Virtual Server (see image below)


4. After click it, see on right panel
Domain name (from freenom.com) = angelimusvps.tk
Description = (type anything you like, eq web1, etc)
Administration password = (type anything you like, eq passweb1, etc)
Administration username = Choose Custom Username and write (from freenom) angelimusvps.tk

Custom username is directory name where your public_html or your directory for website files.
eg: if you type angelimusvps on Custom username, and then in number 7 below, it must be

cd /home/angelimusvps/public_html/

I highly recomended that you using Custom Username same as your Domain name for beginning, so it will not confuse you in the future.


5. Open your browser, try input your domain from freenom (my domain is angelimusvps.tk)

6. It show Forbidden, because there are no website file
7. Now Open your terminal, type
cd /home/angelimusvps.tk/public_html/
echo "This is My First Website using Virtualmin - angelimus.blogpsot.com" >> index.html
Note : change angelimusvps.tk with your created domain

8. Try open your browser again, and type your domain
9. Now you're done,
10. To Create Multiple website, just go to Step 1
when you get stuck into trouble, just take a rest a while... because in the same time, you already resolve it without knowing it

Tutorial Post-Installation Wizard Virtualmin

Now we will configure Post-Installation of Virtualmin, there was a simple wizard provided by Virtualmin to setting Virtualmin based on your VPS resource.


Let's start Post-Installation Wizard
I assume, you already done installing Virtualmin ()
Open your browser.
https://<vps ip address>:10000/
you will see like this (see pic below)

Click Next
Memory Use
1. Preload Virtualmin libraries?
- if your VPS have low resource of memory and you have low frequency of visiting Virtualmin, Disable this option, but if you have more RAM, Enable this.
- Even you Disable this option, Virtualmin UI run stable.

2. Run email domain lookup server?
- if you have high activity in emailing, enable this.
- but if you have less memory, disable this, your email processing is bit slower.

Virus Scanning
Run ClamAV server scanner?
- if your server have high intense of receiving email, you better enable this option, because it lower your CPU Usage but consuming more memory (100Mb), so if you think your server will have activity in emailing, its better to rent vps with high ram
- if your server have low frequency of emailing, disable this.
Spam filteringRun SpamAssassin server filter?
- If your system is going to host domains that will receive a large amount of email, filtering incoming messages for spam can generate significant CPU load. This is due to CPU use by the SpamAssassin mail filter when it is started, so its better you enable this, because its only consume 30Mb,

Database Servers
1. Run MySQL database server
2. Run PostgreSQL database server
- If your server only run email server or DNS hosting, you not need both option above, but if you want to host website on your VPS, i recomend enable MySQL database server, its has more compatible with application nowadays.
Note : if you see >> MySQL has been enabled, but cannot be used by Virtualmin. Use the MySQL Database module to fix the problem.
It means you have not entering the mysql password, just click next, and you'll be asked for MySQL username and password. (check previous tutorial about mysql).
After that the wizard will ask if you want to change the password.

MySQL database sizeMySQL can be configured to trade off memory use for performance, depending on how much RAM your system has and how heavily you expect the database to be used.
The option is clearly explained about how often your mysql is used. If you not sure, just choose leave defaul settings

DNZ Zone
For this, just type server1.angelimus.com or serv1.example.com, etc, ant tick "Skip check for resolvability". I'll explain this in later tutorial.

Password
For this, read the explanation carefully, for me, i choose Store Plain text Password, but i strongly recomended you using Only Stored Hashed Password i'll create this tutorial later.

All Done. Click Next

Install Virtualmin on Centos 6 64 Bit

Hello, today i want to share how to install Virtualmin as Web Management for VPS. Virtualmin is a powerful and flexible web hosting control panel for Linux and UNIX systems based on the well-known Open Source web-based systems management GUI, Webmin. Manage your virtual domains, mailboxes, databases, applications, and the entire server, from one comprehensive and friendly interface.

Note : Because there are a lot of tutorial regarding Virtualmin, so in this tutorial i just share how to install virtual min and what requirement to run Virtualmin, another tutorial will be on diffrent page of tutorial, i will post it one by one, just wait for it, all tutorial about Virtualmin will be updated in this page.

Link my Tutorial about Virtualmin on Centos 6 :


Read this FAQ carefully (Link Source FAQ):

1. Should I install Webmin before I run install.sh?
- No. The install script runs best on a freshly installed Grade A supported Operating System.

2. Should I install Apache, Postfix, MySQL, Dovecot, etc. before I run install.sh?
- No. The install script runs best on a freshly installed Grade A supported Operating System.

3. What if I already installed Webmin on my system?
- If you installed from the standard package type for your system downloaded from Webmin.com or Virtualmin.com, everything should be fine. Running install.sh should work without any trouble.

- If you installed from a third party source, or you don't know where it came from (like it was provided on a dedicated server you've rented from your hosting provider), you should uninstall it, and make sure whatever software repository it came from has been disabled.

4. What if I already installed Apache, Postfic, MySQL, Dovecot, etc. on my system?
- If you installed from the OS standard repository for your OS, everything should be fine. If you installed from any third party sources, or from source, the installation will fail and things will go badly. The install script cannot accommodate packages installed from non-standard sources. It just isn't that smart.
- If you can re-install your OS, it is recommended that you start with a freshly installed Grade A supported Operating System.

Explanation about the FAQ.
In point 1 and 2, it mention about install.sh, it means a script to do an automate install of Virtualmin that officially provided by Virtualmin.com (here is the link)

How about my experienced?
  • I Have successfully install Virtualmin without re-install my OS, Before i install Virtualmin in my VPS, i have do several package instalation from my own tutorial in this blog including MySQL, SSH Dropbear, PPTP VPN, Wordpress, and KDE.
  • I'M NOT SAID that my installation of Virtualmin, there are no problem in future because i'm not re-install the OS.
  • Point 4 in FAQ, encourage me to NOT re-install the OS, because all my packages are from standard repository of Centos 6, you maybe seen my previous tutorial not like the ordinary tutorial, many source i used from github, actually what i grab from github (my own account zaq111 for storing code) is my own code that i create to automate the installation, so people can simple remember.

Okay, lets Start, hope there are not much trouble in Future

Open your terminal and type this (or just copy and paste it on your terminal)
wget http://software.virtualmin.com/gpl/scripts/install.sh
sh ./install.sh
Just wait and follow the instruction, this process may takes about 10 - 20 Minutes or maybe less (i not sure about this, because when i install, i go for about 1 hour to the market :P) After installation complete.
Open your browser, and add your VPS IP or domain in browser.
https://<vps ip address>:10000/

Username = root
Password = your root password

Until this step, i will stop the tutorial, it means you have install successfully Virtualmin, but its not over yet, there are a few configuration to make Virtualmin running smoothly on your VPS and not overload the CPU or Memory. See you in next tutorial about Virtualmin.