Saturday, July 4, 2015

Tutorial Proxy Load Balancing with Proxifier

Hello again, now i want to show how to use proxy with load balancing using proxifier, what is that mean? it's mean that you can use multiple proxy at the same time to browsing on website or do something that have connection to the internet.
With load balancing, it will prevent overload on some proxy too, take some example, you load 10 website at the same time, if you only use 1 proxy, it will slowing your website to open because proxy have to request to many connection at the same time, but if you use 5-10 proxy, it will boost your request to server.

tutorial load balancing proxy using proxifier

What you need is Proxyfier and working proxy or socks5, here is the link to download

Proxifier : https://www.proxifier.com/distr/ProxifierSetup.exe (shareware, trial 31 Days, for windows only)
Working Proxy : http://angelimus.com/dailyproxy (Update proxy every minute)

After you download proxifier, install it, and open it, you will see like this :

proxifier
1. This is for add proxy to use
2. This is to add rules

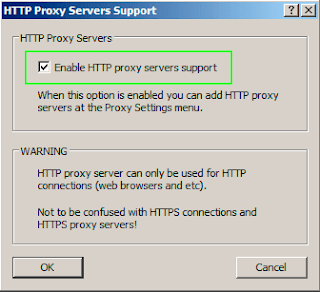
Click on Profile >> Click Advanced >> Http Proxy Servers...

enable http proxy servers support on proxifier
tick on Enable HTTP proxy servers support, then click OK

Now we will add 2 proxy to use, click on add proxy icon 

naming your type

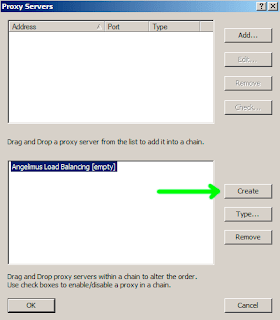
Click on create and give it names for type, ex : angelimus load balancing
And then click on type, select LOAD BALANCING, see pic below


if you done, press ok.
Now, you already create load balancing for your proxy, now click on add (number 1, pic below)

add proxy to used in proxifier

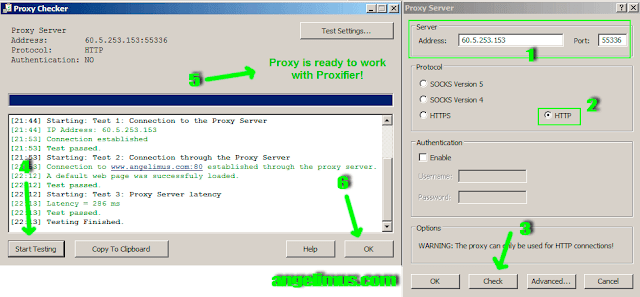
add proxy and check proxy if works
1. Type Proxy address and port here
2. Click on type of proxy, usually HTTP or HTTPS or SOCKS5 if you using socks5
3. Click on check
4. Click start testing, wait a while, to check if proxy is alive or not blocked in your country
5. If you see this, it means the proxy can be used.
6. Click OK, then Click OK again.

Now, you have 1 proxy to used, add more proxy using same step.
After that, you will see like below


Click on the IP address, Hold it and Drag it, release in text Angelimus Load Balancing, do this to all your IP in the list, see image above.
After that, click OK.
Now, we create rules for our load balancing. Click on proxifier rules

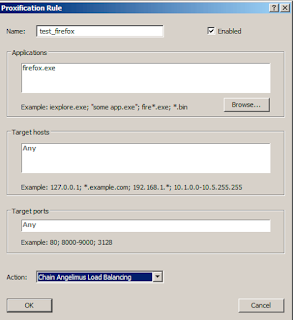
add rules for proxifier

Add Name : <type name you like, ex : test_firefox>
Application : <this is coloumn for application name>
Action : Choose Chain Angelimus Load Balancing, or the name you create before in load balancing.
There are a few option in Actions
1. Direct = The apllication listed in application box will NOT Using Proxifier, but using direct connection through the internet.
2. Block = The apllication listed in application box will NOT Using Proxifier, and NOT using your internet connection through the internet
3. Proxy xxx.xxx.xxx.xxx:xxxx = The apllication listed in application box will use only Proxy That you specified
4. Chain Angelimus Load Balancing = The apllication listed in application box will using Proxifier with Load Balancing capability.

After that, click ok, and try open Firefox and browse, you will see the Proxifier running.
In this tutorial i only give 1 example to Firefox for using Load Balancing.

Friday, July 3, 2015

How to install Squid Proxy 3.5.5 on Centos 6.6 64Bit

Hello, now we are going to install Squid 3.5.5-1 Release May 29, 2015. Before we continue, in previous i have explain in detail how to install squid proxy on Centos 6, it works on 64bit and 32bit architecture (http://www.angelimus.com/2015/07/how-to-create-elite-proxy.html).
But now i only try in Centos 6.6 with 64Bit architecture with VPS from Evoburst.com.


Case : I have run VPS With Centos 6.6 64Bit with Squid Proxy Server 3.5.0.4, and i want to upgrade it to Squid Proxy Server 3.5.5-1.

Step 1 - Installing Squid Proxy Server 3.5.0.4 
Lazy Mode Method = Install Repository, Install Squid 3.5.0.4, Configure Elite Proxy.

Now, we must add repository first, because old repository only serve Squid 3.1.10, i have create lazy mode, just type :

wget https://raw.githubusercontent.com/zaq111/bash/master/angelimus-install-squid-355.sh 

chmod +x angelimus-install-squid-355.sh && sh angelimus-install-squid-355.sh

It's done, you have Elite Squid Proxy 3.5.0.4 installed on your VPS, now let's we costumize our squid.conf a little bit, type :

vi /etc/squid/squid.conf 

Scroll down and find similar like below (i only show how to make public proxy, you can change below configuration into personal or authenthicated system, see previous tutorial about installing proxy at step 2 (How to Install Elite Proxy on Centos 6)

# And finally deny all other access to this proxy
http_access deny all

change http_access deny all into http_access allow all

Scroll down again and find

# Squid normally listens to port 3128
http_port 3128

change http_port 3128 into http_port 5678

save it by type :wq and type :

service squid restart

Now you are done, you have running squid, try it on your web browser.
Until this step you already done install squid 3.5.0.4, if you don't want to continue to next step, it's ok, you still can use your squid 3.5.0.4.

test proxy using firefox
change ip address with your VPS IP Address

Step 2 - Installing Squid Proxy Server
Manual Method = Upgrade Squid 3.5.0.4 to Squid 3.5.5-1.

Maybe there are a big question in your head, why not just install squid 3.5.5 rather than installing squid 3.5.0.4, well, i don't have a specific answer for that question, what i know is, if you start installing 3.5.0.4, it will not installed, because there are no dependancies, but maybe someone else know how to install 3.5.5-1 without install 3.5.0.4 first, i'm curious too :P

Ok, let's start. Just type :

service squid stop

[root@centos6 ~]# service squid stop
Stopping squid: ................                           [  OK  ]

squid -v | grep Squid
[root@centos6 ~]# squid -v | grep Squid
Squid Cache: Version 3.5.0.4

rpm -Uvh http://www1.ngtech.co.il/repo/centos/6/x86_64/squid-3.5.5-1.el6.x86_64.rpm

Preparing...                ########################################### [100%]
   1:squid                  ########################################### [100%]
squid.conf.documented is at /usr/share/squid-3.5.5/squid.conf.documented

It's done, now check your version again.

squid -v | grep Squid

[root@centos6 ~]# squid -v | grep Squid
Squid Cache: Version 3.5.5

Let's check our configuration, is it still same?

vi /etc/squid/squid.conf

In my VPS, there are NO CHANGES at all, it's upgraded succesfully.
Now let's start squid

service squid start

[root@centos6 ~]# service squid start
Starting squid: .                                          [  OK  ]

Let's try open angelimus.com


elite proxy
proxy not detected
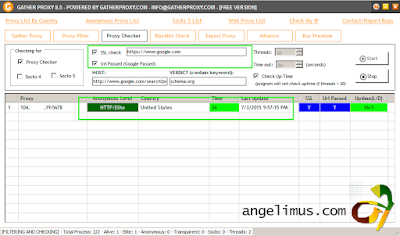
checking elite proxy using gather proxy 8.5


It's done, if you have some problem, please check my previous tutorial (How to Install Elite Proxy on Centos 6
Thanks, and see you in next tutorial.

How to install Squid on Centos 6.6 as an elite proxy

Hello again, now i want to share about squid proxy, before we start let's knowing squid by definition first, Squid is a caching and forwarding web proxy. It has a wide variety of uses, from speeding up a web server by caching repeated requests; to caching web, DNS and other computer network lookups for a group of people sharing network resources; to aiding security by filtering traffic
wikipedia.com

Install squid as elite proxy on centos 6.6

Yesterday "someone" has email me about my instalation method, which is using auto install, he suggest to provide 2 installation method, first is using auto install or "lazy mode" and the second is manual install line by line.

But because squid installation no needed auto installation, because many custumize option depend on user necessary, so lazy mode will not provided this time. Let's start

Step 1 - Installing Squid (as a base and must do)


yum -y install squid

when it's done, type below

vi /etc/ squid/squid.conf

This is the master configuration file for squid, you can costumized squid here, but for minimum requirement of squid, the default setting is work, it's what everybody said, including my friend.
I can't get squid start for first time even squid is running

[root@centos6 ~]# service squid start
Starting squid: ................                           [  OK  ]

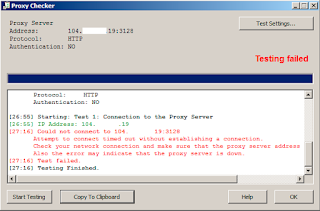
But when i check using proxyfier this what i got, if you don't know what is proxifier, click this link (http://www.angelimus.com/2015/07/proxy-load-balancing.html)

squid started but cant connect to internet

For information, i'm using VPS from Evoburst.com with centos 6.6 64Bit. By default, squid proxy run in port 3128.
So if we see error information above picture, it says

Could not connect to 104.xxx.xxx.19:3128

My guess is there are something wrong with port 3128, now try change the port by editing /etc/squid/squid.conf

vi /etc/squid/squid.conf

and find http_port 3128 and change it to http_port 5678
now let's save it by press ESC on keyboard and type :wq

service squid restart

let's go to proxifier again and check it.

squid connected but no internet

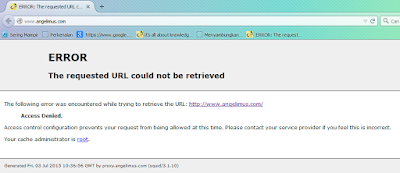
Now we are allowed to use the port, but still not pass, through the internet. If we try using browser, using this port, it will show like this

squid access denied

That's good, why i said it's good? it because squid has been detected, and we can know for sure our squid is running.
Picture above means there are something wrong in /etc/squid/squid.conf actually its not wrong but we need a little costumize in our configuration. Now open your squid.conf by type :

vi /etc/squid/squid.conf

let see at the top of your file you will see similar like below (i will copy paste it and explain it)

#
# Recommended minimum configuration:
#
acl manager proto cache_object
acl localhost src 127.0.0.1/32 ::1
acl to_localhost dst 127.0.0.0/8 0.0.0.0/32 ::1

# Example rule allowing access from your local networks.
# Adapt to list your (internal) IP networks from where browsing
# should be allowed
acl localnet src 10.0.0.0/8     # RFC1918 possible internal network
acl localnet src 172.16.0.0/12  # RFC1918 possible internal network
acl localnet src 192.168.0.0/16 # RFC1918 possible internal network
acl localnet src fc00::/7       # RFC 4193 local private network range
acl localnet src fe80::/10      # RFC 4291 link-local (directly plugged) machines

What is acl? acl is Access List, so all user that want to use squid proxy must be listed here.
We take example at Line 11, see below

acl localnet src 10.0.0.0/8
-- it read like this, Access List with group localnet with source 10.0.0.0/8

Still confuse? i bet you will, don't worry.
1. 10.0.0.0/8 This is CIDR (Classless Inter-Domain Routing) Identification, it present ip address within range 10.0.0.0 - 10.255.255.255
2. Localnet this is group identifier, so we can allow which group can use proxy using rule.

So, from above acl we see :
10.0.0.0/8 Range = 10.0.0.0 - 10.255.255.255
172.16.0.0/12 Range = 172.16.0.0 - 172.31.255.255
192.168.0.0/16 Range = 192.168.0.0 - 192.168.255.255

Scrool down your squid.conf you will find like this :

# And finally deny all other access to this proxy
http_access deny all

it will deny access to proxy server if you ip is other than listed above by, since my ip is 104.xxx.xxx.19, it will not allowed.

In step 2, Choose between 2.1 or 2.2 or 2.3 depend on your necessary.
Step 2.1 - How to Allowed All IP to using Proxy Server, make it Public
So, if you want to allow all user ip address in the world to use your proxy server, edit your squid-conf, and find :

http_access deny all 

change it to http_access allow all

save it, and restart your squid by type

service squid restart

Now squid allready connected and running, it accept all ip address without limitation.

check squid using proxifier

Step 2.- How to Make squid Personally (Private Use Only)
Edit your squid.conf and add below

acl angelimus src 104.xxx.xxx.19/32

Scroll down, find like below

#
# INSERT YOUR OWN RULE(S) HERE TO ALLOW ACCESS FROM YOUR CLIENTS
#

and type http_access allow angelimus

and make sure it block all ip other than listed, by find

# And finally deny all other access to this proxy
http_access deny all

make sure it is http_access deny all

save squid.conf and restart squid

Step 2.- How make squid public with user authenticated system
This step will explain how to create public squid proxy with user authentication system, so user who want to use proxy must be registered first in order to use proxy service.

authenticated system using squid ncsa_auth

So before user using proxy, it required authentication, see above image.
Let's start with editing your squid.conf (/etc/squid/squid.conf)
goto at very top of file and copy paste below code :

auth_param basic program /usr/lib64/squid/ncsa_auth /etc/squid/passwd
auth_param basic children 2
auth_param basic realm Angelimus Proxy Server
auth_param basic credentialsttl 24 hours
auth_param basic casesensitive off
acl proxusers proxy_auth REQUIRED
http_access deny !proxusers
http_access allow proxusers

for centos 6 64Bit auth_param basic program /usr/lib64/squid/ncsa_auth
for centos 6 32Bit auth_param basic program /usr/lib/squid/ncsa_auth

save squid.conf
Now we will create user and password file for squid

touch /etc/squid/passwd

set file owner to squid

chown root.squid /etc/squid/passwd

set permission for file

chmod 640 /etc/squid/passwd

Now lets create user for squid with name user001


htpasswd /etc/squid/passwd user001

[root@centos6 ~]# htpasswd /etc/squid/passwd user001
New password: <password is not visible, after type password, press enter>
Re-type new password: <retype password>
Adding password for user user001

now restart squid by type

service squid restart

It's done, try open Mozilla Firefox, set the proxy, and try open http://www.angelimus.com

proxy configuration for firefox

Now, try open any website, it will show login before you access it.

Step 3 - Create Elite Proxy
Now lets create elite proxy, open your squid.conf, and add below code at the bottom of file.

tcp_outgoing_address 104.xxx.xxx.19 all
104.xxx.xxx.19 >> replace it with your server ip

forwarded_for off
request_header_access Allow allow all
request_header_access Authorization allow all
request_header_access WWW-Authenticate allow all
request_header_access Proxy-Authorization allow all
request_header_access Proxy-Authenticate allow all
request_header_access Cache-Control allow all
request_header_access Content-Encoding allow all
request_header_access Content-Length allow all
request_header_access Content-Type allow all
request_header_access Date allow all
request_header_access Expires allow all
request_header_access Host allow all
request_header_access If-Modified-Since allow all
request_header_access Last-Modified allow all
request_header_access Location allow all
request_header_access Pragma allow all
request_header_access Accept allow all
request_header_access Accept-Charset allow all
request_header_access Accept-Encoding allow all
request_header_access Accept-Language allow all
request_header_access Content-Language allow all
request_header_access Mime-Version allow all
request_header_access Retry-After allow all
request_header_access Title allow all
request_header_access Connection allow all
request_header_access Proxy-Connection allow all
request_header_access User-Agent allow all
request_header_access Cookie allow all
request_header_access All deny all

NOTE : It's occur to Step 1, Step 2, and Step 3 above.. IMPORTANT!!!
if you can't connect to https, like facebook.com or whatismyip.com or google.com, or another site, do this step :
1. Edit your squid.conf (vi /etc/squid/squid.conf)
2. Find acl SSL_ports port 443, add below that code >> acl SSL_ports port 80

so it will look like this (see below)
acl SSL_ports port 443
acl SSL_ports port 80
acl Safe_ports port 80          # http
acl Safe_ports port 21          # ftp
acl Safe_ports port 443         # https

Save and restart squid.
Now you already have personal proxy server with ELITE PROXY.
Try go to angelimus.com and see what is your ip? It will change into your VPS IP address.

checking proxy using gather proxy 8.5 Free edition
Test my proxy using Gather Proxy 8.5 Free Edition

Monday, June 29, 2015

Modifikasi Client Perfect World Indonesia (config.pck)

tutorial perfect world indonesia config.pck pwtool

Step 1 - It's all about Respect.

Original Post : https://forum.ragezone.com/f452/stools-pw-tools-versions-pw-848042/

All Credit Belong to fgru @RaGEZONE

Step 2 - Download Tools

1. Visual C++ 2008 Express Edition (Optional) Kalau cuma untuk compress dan decompress .PCK sepertinya tidak perlu.

2.  pwTools SVN-Downloader.zip - sTools (PW tools for ALL versions of PW, made by Ronny1982)
( Downloader 3 Mb >> Kemudian setelah download menjadi sekitar 170 Mb)

Step 3 - Extract
1. Install Visual C++ nya sampai selesai, kalau disuruh restart, restart aja komputernya.
2. Buat Folder PWTOOLS di Drive C ato D, trus extract.

3. Click 2x file pwtools-src.bat, trus tunggu, ini proses download, jadi tergantung speed internet kalian.


4. Buka Folder pwtools-src
5. Masuk ke Folder bin
6. Masuk ke Folder sPCK


sampai sini, harusnya udah sama seperti gambar diatas.


Modifikasi Client Config
1. Buka Notepad, ketik


sPCK.exe -pw -x "configs.pck"

2. Simpan file dengan nama Extract-Config.bat trus file type ganti jadi All Files (*.*) trus Save


3. Buka My Computer, cari lokasi  game Perfect World kamu, trus ke folder element.
4. Cari file config.pck (kalau gak ketemu, teken Alt + t + o, trus click di tab VIEW, cari Hide Extension for known file type, trus hilangin centangnya, trus click ok)
5. Copy File tersebut (config.pck), trus paste di C:\PWTOOLS\pwtools-src\bin\sPCK
6. Click 2x Extract-Config.bat


nah sekarang harusnya seperti ini, kalau tidak, cek lagi langkah2-nya.

7. Masuk Folder config.pck.files > configs > 
8. Nah sekarang coba cari file uiconfig.ini, kemudian cari tulisan 


SkipFirstLoadProgress = 1

ganti menjadi

SkipFirstLoadProgress = 0

Ini gunanya untuk melewati loading progress pada saat element client nyala sebelum login. Banyak file lain yang kalian bisa edit sendiri, silahkan dicoba-coba, untuk file .cfg dibuka dengan Notepad, lakukan backup sebelum kalian melakukan modifikas pada file.

9. Jika sudah selesai, sekarang buka Notepad, ketik

sPCK.exe -pw -c "configs.pck.files"

Save nya dengan metode yang sama, di folder C:\PWTOOLS\pwtools-src\bin\sPCK seperti diatas, pilih File Type = All Files (*.*), trus nama filenya Compress-Config.bat


10. Rename config.pck menjadi config-backup.pck ini tujuannya biar file config.pck yang asli tidak di overwrite sama file yang dimodifikasi, sehingga jika ada kesalahan dalam modifikasi, masih ada cadangan file asli.

11. Sekarang click 2x file Compress-Config.bat ini untuk membuat file config.pck yang baru.
12. Copy config.pck yang baru dibuat ke folder game kamu > element
13. Kalau ada konfirmasi Overwrite, timpa aja, biar ga terlalu banyak file backup, soalnya di folder PWTOOLS sudah ada backupnya, yaitu config-backup.pck
14. Selesai, sekarang jalanin Perfect Word, lihat, tidak ada loading progress, langsung ke pemilihan server.
15. Login kedalam game, kemudian Visit http://www.angelimus.com/ for more tutorial.

Di dalam config.pck masih banyak file yang bisa di tweak / modifikasi untuk meringankan kerja CPU kalian, jadi coba - coba aja yah sendiri.

Layak dicoba, buka file badwords.txt kalian, trus udah tau donk mau diapain trus gimana... klo belum juga tahu, baca lagi dari Step -1.


Tutorial berikutnya, kita akan mengurangi beberapa detail seperti pohon, awan, air, rumput, dan beberapa hal lainnya dengan tujuan untuk lebih meringankan kerja dari VGA dan CPU dan juga memberi sedikit keleluasaan untuk RAM.

Friday, June 26, 2015

How to Install Fail2Ban to Prevent SSH Brute Force

Hello, now i want to share how to secure our VPS, VPS has many weak spot to breach, especially in opened port. If you follow my tutorial here, it's not makes your VPS secure, just decrease the chance being breach by unauthorized person, i didn't say hacker, just unauthorized person.
What i want to share is how to prevent your VPS being brute forced through SSH, an old school method, but sometimes it's really effective for VPS with weak password, are you sure your password are not listed in brute force dictionaries? many good dictionaries out there, so beware about your password, you must read tutorial about create strong password (How to Create Strong Password), or you can search in google.com, many good tutorial about create password.

how to install fail2ban to prevent bruteforce ssh

My VPS is sponsored by EthernetServers.com, and i already ask them for permission to brute force it in order for review only and education purpose, but remember, without special permission by asking directly to EthernetServers team or person in charge there, it will cause permanently ban, so read again the Terms of Service.

Here's part of EthernetServers TOS (Terms of Service)

Server AbuseAny attempt to undermine or cause harm to a server or customer of Ethernet Servers is strictly prohibited. As our customer you are responsible for all your accounts. Should you violate the Terms of Services outlined within, your account will be cancelled without chance of refund.

Examples of unacceptable content or links: - Hacking Tools and/or programs
>> Including hacking script using python, bash, etc.
>> Including Metasploit, even if you are a pentester, so there are no exception for this matter.
>> Including Port Scanner too :P, so no hacking activity too, even if your reason is for security purpose.

Now let's Start, first i will scan for opened port.

Host is up (0.036s latency).
Not shown: 994 closed ports
PORT     STATE    SERVICE
22/tcp   open     ssh
80/tcp   open     http
161/tcp  filtered snmp
1723/tcp open     pptp
5901/tcp open     vnc-1
6001/tcp open     X11:1

Port 22 is open, so let's brute port 22, with username root
Let's assume we don't know the password for root, and using dictionary file for brute it.

*************************************
*SSH ----------- Ver. 0.2           *
*Coded by --------------------      *
*Ed---------------earch             *
*lar--------gmail.com               *
*************************************

HOST: 198.23.189.37 Username: root Password file: pass10.txt
====================================================================
Trying password...

Auth OK ---> Password Found: letmein

Times -- > Init: 0.06 End: 1.15

we got the password, which is letmein, let's try using another bruteforcer with the famous Ncrack

Starting Ncrack 0.4ALPHA ( http://ncrack.org ) at 2015-06-26 17:54 CEST

Discovered credentials on ssh://198.23.189.37:22 'root' 'letmein'
ssh://198.23.189.37:22 finished.

Discovered credentials for ssh on 198.23.189.37 22/tcp:
198.23.189.37 22/tcp ssh: 'root' 'letmein'

Ncrack done: 1 service scanned in 18.14 seconds.
Probes sent: 6 | timed-out: 0 | prematurely-closed: 0

Ncrack finished.

Done, that two bruteforcer can detect the password, not more that 1 minute, it is because i already know the right password and i put my password in dictionary, so it will be detected easily, and because i only have 10 word in my dictionary, so it only take a minute less, in the real probe, it takes hour maybe day to brute using dictionary, and it consume lot of resource.

Now, let's see how to prevent bruteforce using fail2ban.
First, you must install fail2ban.

wget https://raw.githubusercontent.com/zaq111/bash/master/angelimus-install-fail2ban.sh
sh angelimus-install-fail2ban.sh

Then wait, it less than 1 minute, there are not much step, i already create auto install for you.
After install, you will automatically see vi editor with file jail.local opened

# Fail2Ban jail base specification file
#
# HOW TO ACTIVATE JAILS:
#
# YOU SHOULD NOT MODIFY THIS FILE.
#
# It will probably be overwitten or improved in a distribution update.
#
# Provide customizations in a jail.local file or a jail.d/customisation.local.
# For example to change the default bantime for all jails and to enable the
# ssh-iptables jail the following (uncommented) would appear in the .local file.
# See man 5 jail.conf for details.
#
# [DEFAULT]
# bantime = 3600
#
# [ssh-iptables]
# enabled = true

It will looks like above, you can scroll it down, and edit it depend on your need, let's scroll down a bit, until you find similar like this (see below)

[DEFAULT]

# "ignoreip" can be an IP address, a CIDR mask or a DNS host. Fail2ban will not
# ban a host which matches an address in this list. Several addresses can be
# defined using space separator.
ignoreip = 127.0.0.1/8

# External command that will take an tagged arguments to ignore, e.g. <ip>,
# and return true if the IP is to be ignored. False otherwise.
#
# ignorecommand = /path/to/command <ip>
ignorecommand =

# "bantime" is the number of seconds that a host is banned.
bantime  = 600

# A host is banned if it has generated "maxretry" during the last "findtime"
# seconds.
findtime  = 600

# "maxretry" is the number of failures before a host get banned.
maxretry = 3

ignoreip >> it means, the ip address in list will not caught by fail2ban if you have wrong input password more than "n" times.

bantime >> it means if someone try to login / brute, it will ban the IP if wrong password for "n" times

maxretry >> this is maximum retry (n) for wrong password. By default, it is 3 times wrong password, you will get banned by 600 (equal to 10 Minute)

if you already configure, type :wq to save and exit from vi editor, and type:

sudo service fail2ban start

It's done, fail2ban already installed and configured, now let's check again by scanning the port

Host is up (0.088s latency).
Not shown: 994 closed ports
PORT     STATE    SERVICE
22/tcp   open     ssh
80/tcp   open     http
161/tcp  filtered snmp
1723/tcp open     pptp
5901/tcp open     vnc-1
6001/tcp open     X11:1

then, try to brute force with the sampe method like before we use.

*************************************
*SSH ----------- Ver. 0.2           *
*Coded by --------------------      *
*Ed---------------earch             *
*lar--------gmail.com               *
*************************************

HOST: 198.23.189.37 Username: root Password file: pass10.txt
====================================================================
Trying password...

Exception in thread mypassw0rd
:
Traceback (most recent call last):
  File "/usr/lib64/python2.6/threading.py", line 532, in __bootstrap_inner
    self.run()
  File "brutessh.py", line 44, in run
    t = paramiko.Transport(hostname)
  File "/home/transport.py", line 235, in __init__
    sock.connect((hostname, port))
  File "<string>", line 1, in connect
error: [Errno 111] Connection refused

Exception in thread r00tismine
:
Traceback (most recent call last):
  File "/usr/lib64/python2.6/threading.py", line 532, in __bootstrap_inner
    self.run()
  File "brutessh.py", line 44, in run
    t = paramiko.Transport(hostname)
  File "/home/transport.py", line 235, in __init__
    sock.connect((hostname, port))
  File "<string>", line 1, in connect
error: [Errno 111] Connection refused

Exception in thread stayawayfromr00t
:
Traceback (most recent call last):
  File "/usr/lib64/python2.6/threading.py", line 532, in __bootstrap_inner
    self.run()
  File "brutessh.py", line 44, in run
    t = paramiko.Transport(hostname)
  File "/home/transport.py", line 235, in __init__
    sock.connect((hostname, port))
  File "<string>", line 1, in connect
error: [Errno 111] Connection refused

Exception in thread letmein
:
Traceback (most recent call last):
  File "/usr/lib64/python2.6/threading.py", line 532, in __bootstrap_inner
    self.run()
  File "brutessh.py", line 44, in run
    t = paramiko.Transport(hostname)
  File "/home/transport.py", line 235, in __init__
    sock.connect((hostname, port))
  File "<string>", line 1, in connect
error: [Errno 111] Connection refused

it's a long list, i just entered a few line that show Connection refused, the password is letmein, but it not accepted, and refused too, because it's retry more than 3 times, but how about if you password is in first line? or second? you must be unluck person :P, but at least your VPS can be a "little secure" newbie who like brute force method will not break in into your VPS :P.

now let's try using Ncrack

Starting Ncrack 0.4ALPHA ( http://ncrack.org ) at 2015-06-26 18:27 CEST

caught SIGINT signal, cleaning up

Ncrack just stand like that, like there are nothing to do, until i press Ctrl+C to break it.
Now try scan again to see our port status.

Not shown: 994 closed ports
PORT     STATE    SERVICE
22/tcp   filtered ssh
80/tcp   open     http
161/tcp  filtered snmp
1723/tcp open     pptp
5901/tcp open     vnc-1
6001/tcp open     X11:1

Our port is filtered, because we are scanning from IP in banned period.
It's done, above are very-very simple and easy technics, but do your VPS can survive from very simple easy technics? thanks for reading, see you in next security testing and how to prevent it. And Big Thanks to EthernetServers.com for providing free VPS.

Thursday, June 25, 2015

VPS can't connect to Internet "Unknown Host"

Hello again, today i want to show you to fix some little problem that may occur on your VPS, i experience it today, while i installing package from yum or in other word officially apps for Centos 6 64Bit, everything is fine, i can host my website using wordpress, connect SSH, surfing with VPN, etc, no problem at all, this time i using VPS provided by EthernetServer.com for review purpose with Intel(R) Xeon(R) CPU E3-1240 v3 @ 3.40GHz as CPU - 2GB Ram - 100GB SSD - and 2TB Bandwidth (check limited offer here).


And, i start reboot my VPS, nothing strange happened or maybe i didn't realized it, i try run VNC and connect to KDE from windows, and tada...

"The connection was refused by the host computer"

And i try start my vncserver from terminal, i type vncserver from terminal, it won't start.
I think my VPS can't connect to Internet, so to make sure, not guessing, i try simple thing, i type :

ping www.google.com

"unknown host"

Yes indeed, there are conflict in network, so it block each other, maybe when you installing some package, you don't realized you already create that conflict.

Fisrt to make sure again i type :

chkconfig --list | grep -Ei 'network|wpa'

network         0:off   1:off   2:on    3:on    4:on    5:on    6:off
NetworkManager  0:off   1:off   2:on    3:on    4:on    5:on    6:off
wpa_supplicant  0:off   1:off   2:off   3:off   4:off   5:off   6:off

That's the problem, 2 network manage in one system, so try remove NetworkManager, type :

yum remove NetworkManager

Then restart or reboot your VPS, try ping first.

ping www.google.com

64 bytes from yyz08s14-in-f16.1e100.net (74.125.226.144): icmp_seq=1 ttl=54 time=2.37 ms
64 bytes from yyz08s14-in-f16.1e100.net (74.125.226.144): icmp_seq=2 ttl=54 time=2.33 ms

it success, then i try connect to KDE using VNC in windows 7

"The connection was refused by the host computer"

this occur because vncserver is not started, try start it by type :

vncserver

New 'server.angelimus.com:1 (root)' desktop is server.angelimus.com:1

Starting applications specified in /root/.vnc/xstartup
Log file is /root/.vnc/server.angelimus.com:1.log

IT's DONE, PROBLEM SOLVED, but what cause that matter? so i reinstall my VPS, and try install package one by one, after installing i do reboot, and then ping, no problem so far, until i install KDE (Tutorial INSTALL KDE click here), after i reboot, i can't ping Google.

So i assume, that source of problem is from KDE, but from previous tutorial that i using another VPS Host, this kind of problem is not exist. Maybe i just unlucky or something passed by me.

Hope my experience can help you solve problem like this.