Hello again, now i want to share about squid proxy, before we start let's knowing squid by definition first, Squid is a caching and forwarding web proxy. It has a wide variety of uses, from speeding up a web server by caching repeated requests; to caching web, DNS and other computer network lookups for a group of people sharing network resources; to aiding security by filtering traffic
Yesterday "someone" has email me about my instalation method, which is using auto install, he suggest to provide 2 installation method, first is using auto install or "lazy mode" and the second is manual install line by line.
But because squid installation no needed auto installation, because many custumize option depend on user necessary, so lazy mode will not provided this time. Let's start
Step 1 - Installing Squid (as a base and must do)
when it's done, type below
[root@centos6 ~]# service squid start
Starting squid: ................ [ OK ]
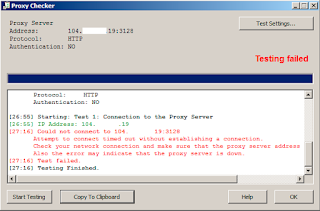
But when i check using proxyfier this what i got, if you don't know what is proxifier, click this link (http://www.angelimus.com/2015/07/proxy-load-balancing.html)
For information, i'm using VPS from Evoburst.com with centos 6.6 64Bit. By default, squid proxy run in port 3128.
So if we see error information above picture, it says
Could not connect to 104.xxx.xxx.19:3128
My guess is there are something wrong with port 3128, now try change the port by editing /etc/squid/squid.conf
and find http_port 3128 and change it to http_port 5678
now let's save it by press ESC on keyboard and type :wq
let's go to proxifier again and check it.
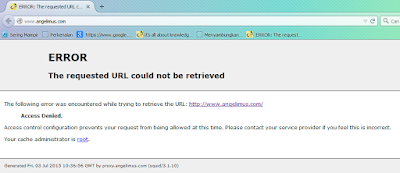
Now we are allowed to use the port, but still not pass, through the internet. If we try using browser, using this port, it will show like this
That's good, why i said it's good? it because squid has been detected, and we can know for sure our squid is running.
Picture above means there are something wrong in /etc/squid/squid.conf actually its not wrong but we need a little costumize in our configuration. Now open your squid.conf by type :
let see at the top of your file you will see similar like below (i will copy paste it and explain it)
#
# Recommended minimum configuration:
#
acl manager proto cache_object
acl localhost src 127.0.0.1/32 ::1
acl to_localhost dst 127.0.0.0/8 0.0.0.0/32 ::1
# Example rule allowing access from your local networks.
# Adapt to list your (internal) IP networks from where browsing
# should be allowed
acl localnet src 10.0.0.0/8 # RFC1918 possible internal network
acl localnet src 172.16.0.0/12 # RFC1918 possible internal network
acl localnet src 192.168.0.0/16 # RFC1918 possible internal network
acl localnet src fc00::/7 # RFC 4193 local private network range
acl localnet src fe80::/10 # RFC 4291 link-local (directly plugged) machines
What is acl? acl is Access List, so all user that want to use squid proxy must be listed here.
We take example at Line 11, see below
acl localnet src 10.0.0.0/8
-- it read like this, Access List with group localnet with source 10.0.0.0/8
Still confuse? i bet you will, don't worry.
1. 10.0.0.0/8 This is CIDR (Classless Inter-Domain Routing) Identification, it present ip address within range 10.0.0.0 - 10.255.255.255
2. Localnet this is group identifier, so we can allow which group can use proxy using rule.
So, from above acl we see :
10.0.0.0/8 Range = 10.0.0.0 - 10.255.255.255
172.16.0.0/12 Range = 172.16.0.0 - 172.31.255.255
192.168.0.0/16 Range = 192.168.0.0 - 192.168.255.255
Scrool down your squid.conf you will find like this :
# And finally deny all other access to this proxy
http_access deny all
it will deny access to proxy server if you ip is other than listed above by, since my ip is 104.xxx.xxx.19, it will not allowed.
So, if you want to allow all user ip address in the world to use your proxy server, edit your squid-conf, and find :
http_access deny all
change it to http_access allow all
save it, and restart your squid by type
Now squid allready connected and running, it accept all ip address without limitation.
Step 2.2 - How to Make squid Personally (Private Use Only)
Edit your squid.conf and add below
Scroll down, find like below
#
# INSERT YOUR OWN RULE(S) HERE TO ALLOW ACCESS FROM YOUR CLIENTS
#
and type http_access allow angelimus
and make sure it block all ip other than listed, by find
# And finally deny all other access to this proxy
http_access deny all
make sure it is http_access deny all
save squid.conf and restart squid
Step 2.3 - How make squid public with user authenticated system
This step will explain how to create public squid proxy with user authentication system, so user who want to use proxy must be registered first in order to use proxy service.
So before user using proxy, it required authentication, see above image.
Let's start with editing your squid.conf (/etc/squid/squid.conf)
goto at very top of file and copy paste below code :
auth_param basic program /usr/lib64/squid/ncsa_auth /etc/squid/passwd
auth_param basic children 2
auth_param basic realm Angelimus Proxy Server
auth_param basic credentialsttl 24 hours
auth_param basic casesensitive off
acl proxusers proxy_auth REQUIRED
http_access deny !proxusers
http_access allow proxusers
for centos 6 64Bit auth_param basic program /usr/lib64/squid/ncsa_auth
for centos 6 32Bit auth_param basic program /usr/lib/squid/ncsa_auth
save squid.conf
Now we will create user and password file for squid
set file owner to squid
set permission for file
Now lets create user for squid with name user001
[root@centos6 ~]# htpasswd /etc/squid/passwd user001
New password: <password is not visible, after type password, press enter>
Re-type new password: <retype password>
Adding password for user user001
now restart squid by type
It's done, try open Mozilla Firefox, set the proxy, and try open http://www.angelimus.com
Now, try open any website, it will show login before you access it.
Step 3 - Create Elite Proxy
Now lets create elite proxy, open your squid.conf, and add below code at the bottom of file.
tcp_outgoing_address 104.xxx.xxx.19 all
104.xxx.xxx.19 >> replace it with your server ip
forwarded_for off
request_header_access Allow allow all
request_header_access Authorization allow all
request_header_access WWW-Authenticate allow all
request_header_access Proxy-Authorization allow all
request_header_access Proxy-Authenticate allow all
request_header_access Cache-Control allow all
request_header_access Content-Encoding allow all
request_header_access Content-Length allow all
request_header_access Content-Type allow all
request_header_access Date allow all
request_header_access Expires allow all
request_header_access Host allow all
request_header_access If-Modified-Since allow all
request_header_access Last-Modified allow all
request_header_access Location allow all
request_header_access Pragma allow all
request_header_access Accept allow all
request_header_access Accept-Charset allow all
request_header_access Accept-Encoding allow all
request_header_access Accept-Language allow all
request_header_access Content-Language allow all
request_header_access Mime-Version allow all
request_header_access Retry-After allow all
request_header_access Title allow all
request_header_access Connection allow all
request_header_access Proxy-Connection allow all
request_header_access User-Agent allow all
request_header_access Cookie allow all
request_header_access All deny all
NOTE : It's occur to Step 1, Step 2, and Step 3 above.. IMPORTANT!!!
if you can't connect to https, like facebook.com or whatismyip.com or google.com, or another site, do this step :
1. Edit your squid.conf (vi /etc/squid/squid.conf)
2. Find acl SSL_ports port 443, add below that code >> acl SSL_ports port 80
so it will look like this (see below)
acl SSL_ports port 443
acl SSL_ports port 80
acl Safe_ports port 80 # http
acl Safe_ports port 21 # ftp
acl Safe_ports port 443 # https
Save and restart squid.
Now you already have personal proxy server with ELITE PROXY.
Try go to angelimus.com and see what is your ip? It will change into your VPS IP address.
wikipedia.com
Yesterday "someone" has email me about my instalation method, which is using auto install, he suggest to provide 2 installation method, first is using auto install or "lazy mode" and the second is manual install line by line.
But because squid installation no needed auto installation, because many custumize option depend on user necessary, so lazy mode will not provided this time. Let's start
Step 1 - Installing Squid (as a base and must do)
yum -y install squid
when it's done, type below
vi /etc/ squid/squid.conf
This is the master configuration file for squid, you can costumized squid here, but for minimum requirement of squid, the default setting is work, it's what everybody said, including my friend.
I can't get squid start for first time even squid is running
Starting squid: ................ [ OK ]
For information, i'm using VPS from Evoburst.com with centos 6.6 64Bit. By default, squid proxy run in port 3128.
So if we see error information above picture, it says
Could not connect to 104.xxx.xxx.19:3128
My guess is there are something wrong with port 3128, now try change the port by editing /etc/squid/squid.conf
vi /etc/squid/squid.conf
and find http_port 3128 and change it to http_port 5678
now let's save it by press ESC on keyboard and type :wq
service squid restart
let's go to proxifier again and check it.
Now we are allowed to use the port, but still not pass, through the internet. If we try using browser, using this port, it will show like this
That's good, why i said it's good? it because squid has been detected, and we can know for sure our squid is running.
Picture above means there are something wrong in /etc/squid/squid.conf actually its not wrong but we need a little costumize in our configuration. Now open your squid.conf by type :
vi /etc/squid/squid.conf
let see at the top of your file you will see similar like below (i will copy paste it and explain it)
#
# Recommended minimum configuration:
#
acl manager proto cache_object
acl localhost src 127.0.0.1/32 ::1
acl to_localhost dst 127.0.0.0/8 0.0.0.0/32 ::1
# Example rule allowing access from your local networks.
# Adapt to list your (internal) IP networks from where browsing
# should be allowed
acl localnet src 10.0.0.0/8 # RFC1918 possible internal network
acl localnet src 172.16.0.0/12 # RFC1918 possible internal network
acl localnet src 192.168.0.0/16 # RFC1918 possible internal network
acl localnet src fc00::/7 # RFC 4193 local private network range
acl localnet src fe80::/10 # RFC 4291 link-local (directly plugged) machines
We take example at Line 11, see below
acl localnet src 10.0.0.0/8
-- it read like this, Access List with group localnet with source 10.0.0.0/8
Still confuse? i bet you will, don't worry.
1. 10.0.0.0/8 This is CIDR (Classless Inter-Domain Routing) Identification, it present ip address within range 10.0.0.0 - 10.255.255.255
2. Localnet this is group identifier, so we can allow which group can use proxy using rule.
So, from above acl we see :
10.0.0.0/8 Range = 10.0.0.0 - 10.255.255.255
172.16.0.0/12 Range = 172.16.0.0 - 172.31.255.255
192.168.0.0/16 Range = 192.168.0.0 - 192.168.255.255
Scrool down your squid.conf you will find like this :
# And finally deny all other access to this proxy
http_access deny all
In step 2, Choose between 2.1 or 2.2 or 2.3 depend on your necessary.
Step 2.1 - How to Allowed All IP to using Proxy Server, make it PublicSo, if you want to allow all user ip address in the world to use your proxy server, edit your squid-conf, and find :
http_access deny all
change it to http_access allow all
save it, and restart your squid by type
service squid restart
Now squid allready connected and running, it accept all ip address without limitation.
Step 2.2 - How to Make squid Personally (Private Use Only)
Edit your squid.conf and add below
acl angelimus src 104.xxx.xxx.19/32
Scroll down, find like below
#
# INSERT YOUR OWN RULE(S) HERE TO ALLOW ACCESS FROM YOUR CLIENTS
#
and make sure it block all ip other than listed, by find
# And finally deny all other access to this proxy
http_access deny all
make sure it is http_access deny all
save squid.conf and restart squid
Step 2.3 - How make squid public with user authenticated system
This step will explain how to create public squid proxy with user authentication system, so user who want to use proxy must be registered first in order to use proxy service.
So before user using proxy, it required authentication, see above image.
Let's start with editing your squid.conf (/etc/squid/squid.conf)
goto at very top of file and copy paste below code :
auth_param basic program /usr/lib64/squid/ncsa_auth /etc/squid/passwd
auth_param basic children 2
auth_param basic realm Angelimus Proxy Server
auth_param basic credentialsttl 24 hours
auth_param basic casesensitive off
acl proxusers proxy_auth REQUIRED
http_access deny !proxusers
http_access allow proxusers
for centos 6 32Bit auth_param basic program /usr/lib/squid/ncsa_auth
save squid.conf
Now we will create user and password file for squid
touch /etc/squid/passwd
set file owner to squid
chown root.squid /etc/squid/passwd
set permission for file
chmod 640 /etc/squid/passwd
Now lets create user for squid with name user001
htpasswd /etc/squid/passwd user001
[root@centos6 ~]# htpasswd /etc/squid/passwd user001
New password: <password is not visible, after type password, press enter>
Re-type new password: <retype password>
Adding password for user user001
service squid restart
It's done, try open Mozilla Firefox, set the proxy, and try open http://www.angelimus.com
Now, try open any website, it will show login before you access it.
Step 3 - Create Elite Proxy
Now lets create elite proxy, open your squid.conf, and add below code at the bottom of file.
tcp_outgoing_address 104.xxx.xxx.19 all
104.xxx.xxx.19 >> replace it with your server ip
forwarded_for off
request_header_access Allow allow all
request_header_access Authorization allow all
request_header_access WWW-Authenticate allow all
request_header_access Proxy-Authorization allow all
request_header_access Proxy-Authenticate allow all
request_header_access Cache-Control allow all
request_header_access Content-Encoding allow all
request_header_access Content-Length allow all
request_header_access Content-Type allow all
request_header_access Date allow all
request_header_access Expires allow all
request_header_access Host allow all
request_header_access If-Modified-Since allow all
request_header_access Last-Modified allow all
request_header_access Location allow all
request_header_access Pragma allow all
request_header_access Accept allow all
request_header_access Accept-Charset allow all
request_header_access Accept-Encoding allow all
request_header_access Accept-Language allow all
request_header_access Content-Language allow all
request_header_access Mime-Version allow all
request_header_access Retry-After allow all
request_header_access Title allow all
request_header_access Connection allow all
request_header_access Proxy-Connection allow all
request_header_access User-Agent allow all
request_header_access Cookie allow all
request_header_access All deny all
NOTE : It's occur to Step 1, Step 2, and Step 3 above.. IMPORTANT!!!
if you can't connect to https, like facebook.com or whatismyip.com or google.com, or another site, do this step :
1. Edit your squid.conf (vi /etc/squid/squid.conf)
2. Find acl SSL_ports port 443, add below that code >> acl SSL_ports port 80
so it will look like this (see below)
acl SSL_ports port 443
acl SSL_ports port 80
acl Safe_ports port 80 # http
acl Safe_ports port 21 # ftp
acl Safe_ports port 443 # https
Now you already have personal proxy server with ELITE PROXY.
Try go to angelimus.com and see what is your ip? It will change into your VPS IP address.
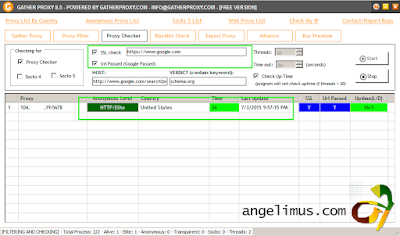
Test my proxy using Gather Proxy 8.5 Free Edition


