Hello again, now i want to show how to use proxy with load balancing using proxifier, what is that mean? it's mean that you can use multiple proxy at the same time to browsing on website or do something that have connection to the internet.
With load balancing, it will prevent overload on some proxy too, take some example, you load 10 website at the same time, if you only use 1 proxy, it will slowing your website to open because proxy have to request to many connection at the same time, but if you use 5-10 proxy, it will boost your request to server.
What you need is Proxyfier and working proxy or socks5, here is the link to download
Proxifier : https://www.proxifier.com/distr/ProxifierSetup.exe (shareware, trial 31 Days, for windows only)
Working Proxy : http://angelimus.com/dailyproxy (Update proxy every minute)
After you download proxifier, install it, and open it, you will see like this :
1. This is for add proxy to use
2. This is to add rules
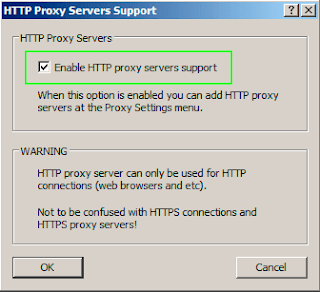
Click on Profile >> Click Advanced >> Http Proxy Servers...
tick on Enable HTTP proxy servers support, then click OK
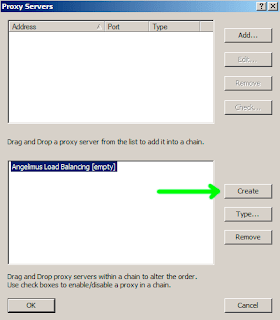
Click on create and give it names for type, ex : angelimus load balancing
And then click on type, select LOAD BALANCING, see pic below
if you done, press ok.
Now, you already create load balancing for your proxy, now click on add (number 1, pic below)
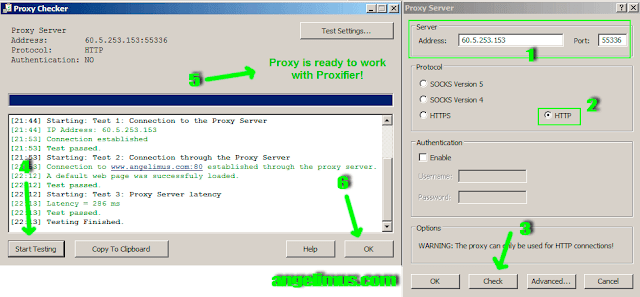
1. Type Proxy address and port here
2. Click on type of proxy, usually HTTP or HTTPS or SOCKS5 if you using socks5
3. Click on check
4. Click start testing, wait a while, to check if proxy is alive or not blocked in your country
5. If you see this, it means the proxy can be used.
6. Click OK, then Click OK again.
Now, you have 1 proxy to used, add more proxy using same step.
After that, you will see like below
Click on the IP address, Hold it and Drag it, release in text Angelimus Load Balancing, do this to all your IP in the list, see image above.
After that, click OK.
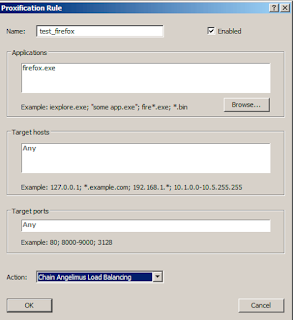
Add Name : <type name you like, ex : test_firefox>
Application : <this is coloumn for application name>
Action : Choose Chain Angelimus Load Balancing, or the name you create before in load balancing.
There are a few option in Actions
1. Direct = The apllication listed in application box will NOT Using Proxifier, but using direct connection through the internet.
2. Block = The apllication listed in application box will NOT Using Proxifier, and NOT using your internet connection through the internet
3. Proxy xxx.xxx.xxx.xxx:xxxx = The apllication listed in application box will use only Proxy That you specified
4. Chain Angelimus Load Balancing = The apllication listed in application box will using Proxifier with Load Balancing capability.
After that, click ok, and try open Firefox and browse, you will see the Proxifier running.
In this tutorial i only give 1 example to Firefox for using Load Balancing.


I use a VPN and when I go for an IP of a specific country so I come to know that the IP is not working because of load on that Ip and have to change that but thanks to you that you gave me an idea that how to distribute that load as I have to consult a lot of research paper writing services to make unique contents so it will definitely help me in writing unique contents.
ReplyDeleteThank you for sharing those materials here. I hope that you'll add more ideas on that later on. I'll wait for more curious ideas.
ReplyDeleteMany thanks for providing essential materials. I really needed this information for implementation of my plans and ideas.
ReplyDeleteI am also glad to have found this page! This is an extremely important and meaningful report you have shared with us! Keep it up!
ReplyDelete